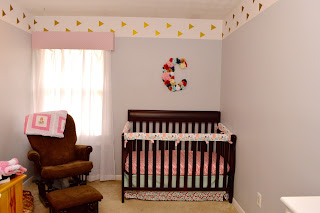
Baby Girls Nursery Reveal
After having two boys, and
putting together two different BOY nurseries, I was so excited to go in a
completely different direction this time around. Yes, dinos, cars, and
animals are cute, but girly pink and flowers are much more fun to craft
together. This nursery turned out better than I thought it would and it
is all DIY! And if I did it, so can you! Thank you PINTEREST!
Lets start with the walls.
Where the white is, there used to be green with a small white stripe.
Originally, we were just going to paint it and leave it white. BUT, after
doing that I HATED it! Luckily, I gained some inspiration from the bedding and
found these vinyl triangles on Etsy. They
were a great price and we were very pleased with them. Especially because
they came with more than the 100 it said it would. The laser level came in
handy when hanging these.
The bedding
I
couldn't find bedding that I really liked anywhere. Again, I turned to
Etsy but then realized how expensive it was to get a custom made bedding set
($300 and up!!!). Thank goodness for pinterest and all the tutorials.
I hit up Joann's fabric on Black Friday to get all my fabric for 50% off
plus more with other coupons ($60ish). Luckily, I had my AWESOME sister (check out her shop!) help me with the
skirt since I have never done piping before. But everything else I did on
my own and it only took a couple of nap times and after kids bed times nights.
I
used this page to make an adjustable crib skirt That way I can just retie it when we lower the bed and the skirt still
looks nice. Also, instead of making my own ties for that and the crib
rail guard, I used quilting binding and didn't even bother sewing it. All
I did was cut them and sew them onto the fabric.
Here is
the link for the crib rail guard. A much easier and
better choice instead of the crib bumpers. For the Crib sheets, I'm not sure why
you wouldn't just make your own!! It takes about 2 hours and you can use
any fabric you want for cheaper than buying a sheet! (Always use a coupon or
hit up a sale at Joanns or Hobby Lobby)
The C
This was
my favorite and most nerve wrecking DIY. I have seen these floral letters
on pinterest and knew I wanted to do one, but it could be a very expensive
pinterest fail. I first waited for the 50% off sale at Hobby Lobby in the
floral department and used my 40% off coupon for the letter C. I first
spray painted the C white incase any wood showed through. I bought all
the flowers I thought I would need plus some in coordinating colors with the
bedding. Now it was the scary part. Cutting off the flowers and
positioning them. I started small just in case it wasn't looking right. Luckily,
it came together beautifully and I could return some flowers that I didn't
need. This took a couple of hours of cutting and hot glueing.
The Window Valance
The window valance was a
must! Luckily, I had made something similar in our living room so this was
fast. I bought some foam project board, cut it to size, hot glued the
sides and the fabric on. VIOLA!
Thanks to hobby lobby, I was able to find this matching decor and lamp. This dresser also used to be green (garage sale find for $15 for Jackson's nursery). Now it's a classic white with the pulls painted gold.
The Mobile
This
mobile was probably the most time consuming/tedious task. I had made one
for Jackson's nursery so I knew how to do it.All you need is: a metal hoop ring
wrapped in ribbon, various scrapbook paper (the thicker the better), metal
jewelry rings found in the jewelry making aisle, and to make it go faster, a
circle punch.
If you use the thinner
scrapbook paper that is one sided, you will need to glue two circles together
(I only did it for some. Mainly because I ran out and didn't want to go
back to hobby lobby). The plain colors are thicker and two sided.
To get them linked together into strands, you use the jewelry rings and
you can do it in any color combo or pattern. I added some dangling flowers
to make it look fuller.
Again, a
DIY. You make it the same way as a sheet, just smaller. Also,
cheaper than buying one!
Also, notice the beautiful
wooden picture holder I got from a friend at my baby shower. It ties everything
together perfectly!
Bow Holder
If you have a girl, don't
forget the bow holder!! Believe it or not, I couldn't find a wood base that I
liked at hobby lobby, so I picked this up at Walmart. I hot glued some
small wood clothes pins to it and painted them gold. Super easy, super cute.
But, I think it's already full =)
I can't believe we finished it and it turned out so well! I am IN LOVE and can't wait to bring Charlotte home to it!
#PinterestWin


Comments
Post a Comment
Drop us a line